Subscribe:

Labels


Showing posts with label TIPS & TRIK. Show all posts

Monday, March 4, 2019

CARA UBL - UNLOCK BOOTLOADER XIAOMI MI 5


Xiaomi Mi5 memang sudah lama hadir dengan performa yang powerfull dengan harga yang menggiurkan, dan inilah yang menjadi salah satu alasan bertambah banyaknya pemakai device ini secara cepat, hingga dengan demikian semakin subur pula thread dalam komunitas developers terkait device ini, tetapi untuk menerapkan semua trik, mod, bahkan update system secara official dan unofficial yang tersedia tidak jarang di butuhkan sebuah device yang sudah berada dalam keadaan unlock bootloader.

Cara unlock bootloader Xiaomi Mi5 ini sama saja seperti device Xiaomi lainnya, tetapi untuk lebih jelasnya atau belum pernah melakukan Unlock Bootloader pada devcie Xiaomi kalian bisa ikuti tutorial ini sampai selesai.

Hal yang di butuhkan:
1. PC atau Laptop
2. Koneksi internet
3. USB Cable yang masih berfungsi dengan baik
4. Xiaomi Mi5
5. Jika ingin 100% berhasil unlock bootloader dalam sekali jalan, gunakan triknya DISINI.

Perlu di ingatkan sekali lagi, perhatikan dengan hati-hati setiap detail yang di jelaskan pada tutorial ini, karena dalam menjalankan method seperti ini di butuhkan ketelitian karena resiko yang di hadapi cukup besar, kalau sudah siap langsung saja kita masuk dalam bahasan utama dari tutorial ini.

Cara Unlock Bootloader:
1. Pastikan device kalian berada dalam ROM official MIUI versi China, karena hanya ROM versi China yang akan mampu sukses melakukan Unlock Bootloader terhadap Xiaomi Mi5 tersebut, dan jika belum terpasang ROM versi China, silahkan pasang sendiri ROM veris China dengan mendownload DISINI, lalu pasangkan dengan menggunakan aplikasi updater >> Choose update package, yang berada menu pilihan dalam aplikasi updater, navigasikan ke ROM yang sudah kalian download tadi maka Xiaomi Mi5 kalian akan di pasangkan ROM baru tetapi dengan versi China.
2. Jika ROM sudah berada di versi China, selanjutnya kalian harus request terlebih dahulu ke forum MIUI, bisa kunjungi DISINI atau gunakan cara terbaru dan tercepat untuk proses unlock bootloader Xiaomi DISINI.
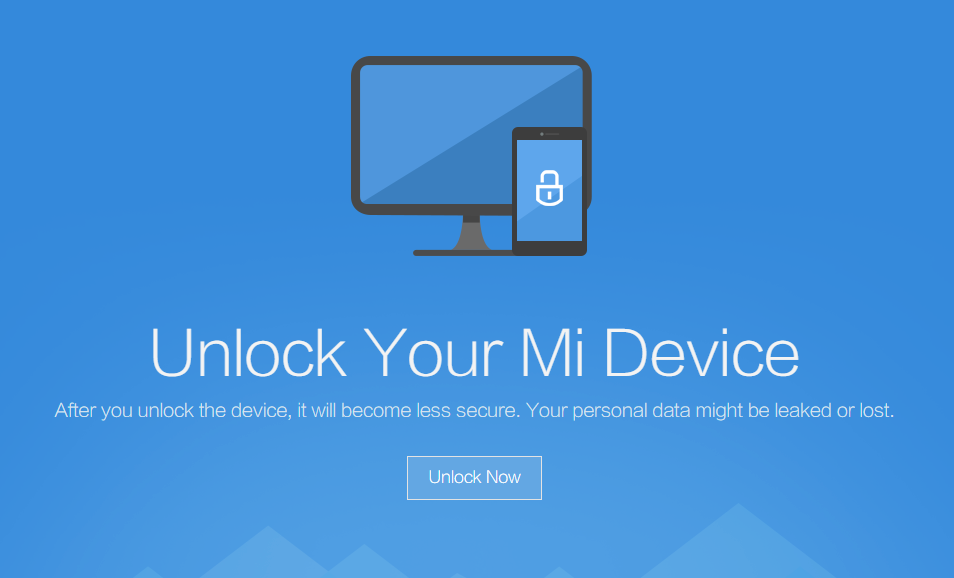
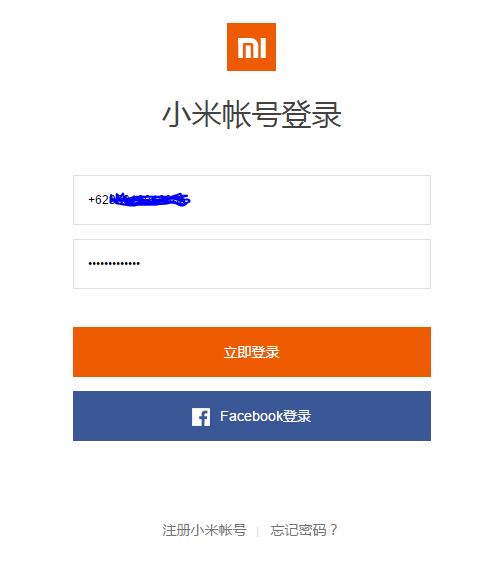
3. Selanjutnya masuk pada Tab "Unlock" selanjutnya akan di bawa ke halaman baru, selanjutnya click pada button Unlock Now, hal pertama kalian harus Login dulu, kalau belum punya akun daftar kan saja gratis dan cepat kok.
4. Kemudian kalian harus mengisi informasi pengiriman kode unlock nantinya, pastikan nomor telepon kalian bisa di hubungi dengan baik dan jangan sampai salah, jika sudah yakin "centang" ketentuan dari Xiaomi yang berada di bawah, langkah selanjutnya tinggal click button "Apply Now".
5. Lalu kalian hanya perlu menunggu beberapa saat saja lagi kode unlocknya yang mungkin tidak akan hadir kurang dari 5 hari, jadi bersabarlah, proses pengiriman kode unlock melalui SMS memang memakan waktu lama.


6. Jika SMS notifikasi kode Unlock sudah tiba, silahkan kunjungi lagi situs Unlocknya dan masukan kode Unlock yang sudah di terima melalui SMS sebelumnya.
7. Kemudian kalau sudah berhasil kalian akan di bawa pada halaman baru dan untuk mendownload tool Unlocknya yang kerap di sebuat Mi Flash Unlock, untuk versi bahasa inggrisnya download DISINI.
8. Setelah selesai jalankan aplikasi Mi Flash Unlocknya dengan "Run As Administrator".
9. Lalu selanjutnya, akan muncul halaman ketentuan, pada opsi ini pilih Accept saja, selanjutya Login dengan akun yang sudah kalian miliki.
10. Langkah terakhir, silahkan koneksikan device Xiaomi Mi5 kalian dalam keadaan Power Off ke PC dengan menekan berbarengan tombol Volume Down (-) dan Power ( Fastboot Mode), jika sudah terhubung dan terkoneksi dengan baik, selanjutnya tinggal tekan button "Unlock" dari jendela aplikasi Mi Flash Unlock yang muncul.
11. Tunggu Sampai proses selesai, lalu Reboot, Beres!
12. Jika unlock bootloader gagal pada angka 50%, solusinya ikuti tutorialnya DISINI.

Jika ingin cek status bootloader atau relock bootloader kembali kalian bisa coba tutorial singkatnya DISINI

Sejauh ini kalian sudah berhasil melakukan Unlock Terhadap device Xiaomi Mi5 yang kalian miliki, dan kami ingatkan sekali lagi tolong perhatikan dan jalankan dengan hati-hati karena segala kerusakan yang terjadi bukan tanggung jawab dari kami, jadi bijaksanalah.

Tutorial ini sudah kami coba dan berhasil dengan baik jadi jika kalian mengikuti semua prosedur yang sudah di sebutkan di atas maka di jamin tutorial ini akan berhasi secara 100%, selamat mencoba dan semoga berhasil.

SOURCE KLIK HERE

Friday, April 13, 2018

Cara Install phpMyAdmin di Ubuntu 16.04

Pendahuluan

Pada dasarnya, mengelola database dengan MySQL harus dilakukan dengan cara mengetikkan perintah yang sesuai untuk setiap tujuan tertentu. Kita harus hafal bagaimana jika ingin menghapus, membuat atau pun mengubah record , namun dengan phpmyadmin, kita bisa mengelola database dengan mudah Karena berbasis web, sekali klik, semua perintah dapat dijalan kan tanpa mengetik command line.

Persyaratan

  1. Client SSH seperti Bitvise atau Putty
  2. Pengetahuan dasar tentang peritah Linux/Unix
  3. Server atau VPS dengan RAM minimal 256MB (openVZ), disarankan 512 MB jika Anda menggunakan KVM atau Xen
  4. Ubuntu 16.04, 32 bit atau 64 bit

Instal PHPMYADMIN

  1. Pertama dan yang paling penting, anda harus sudah menginstal php7, MariaDB dan web server (apache/nginx)
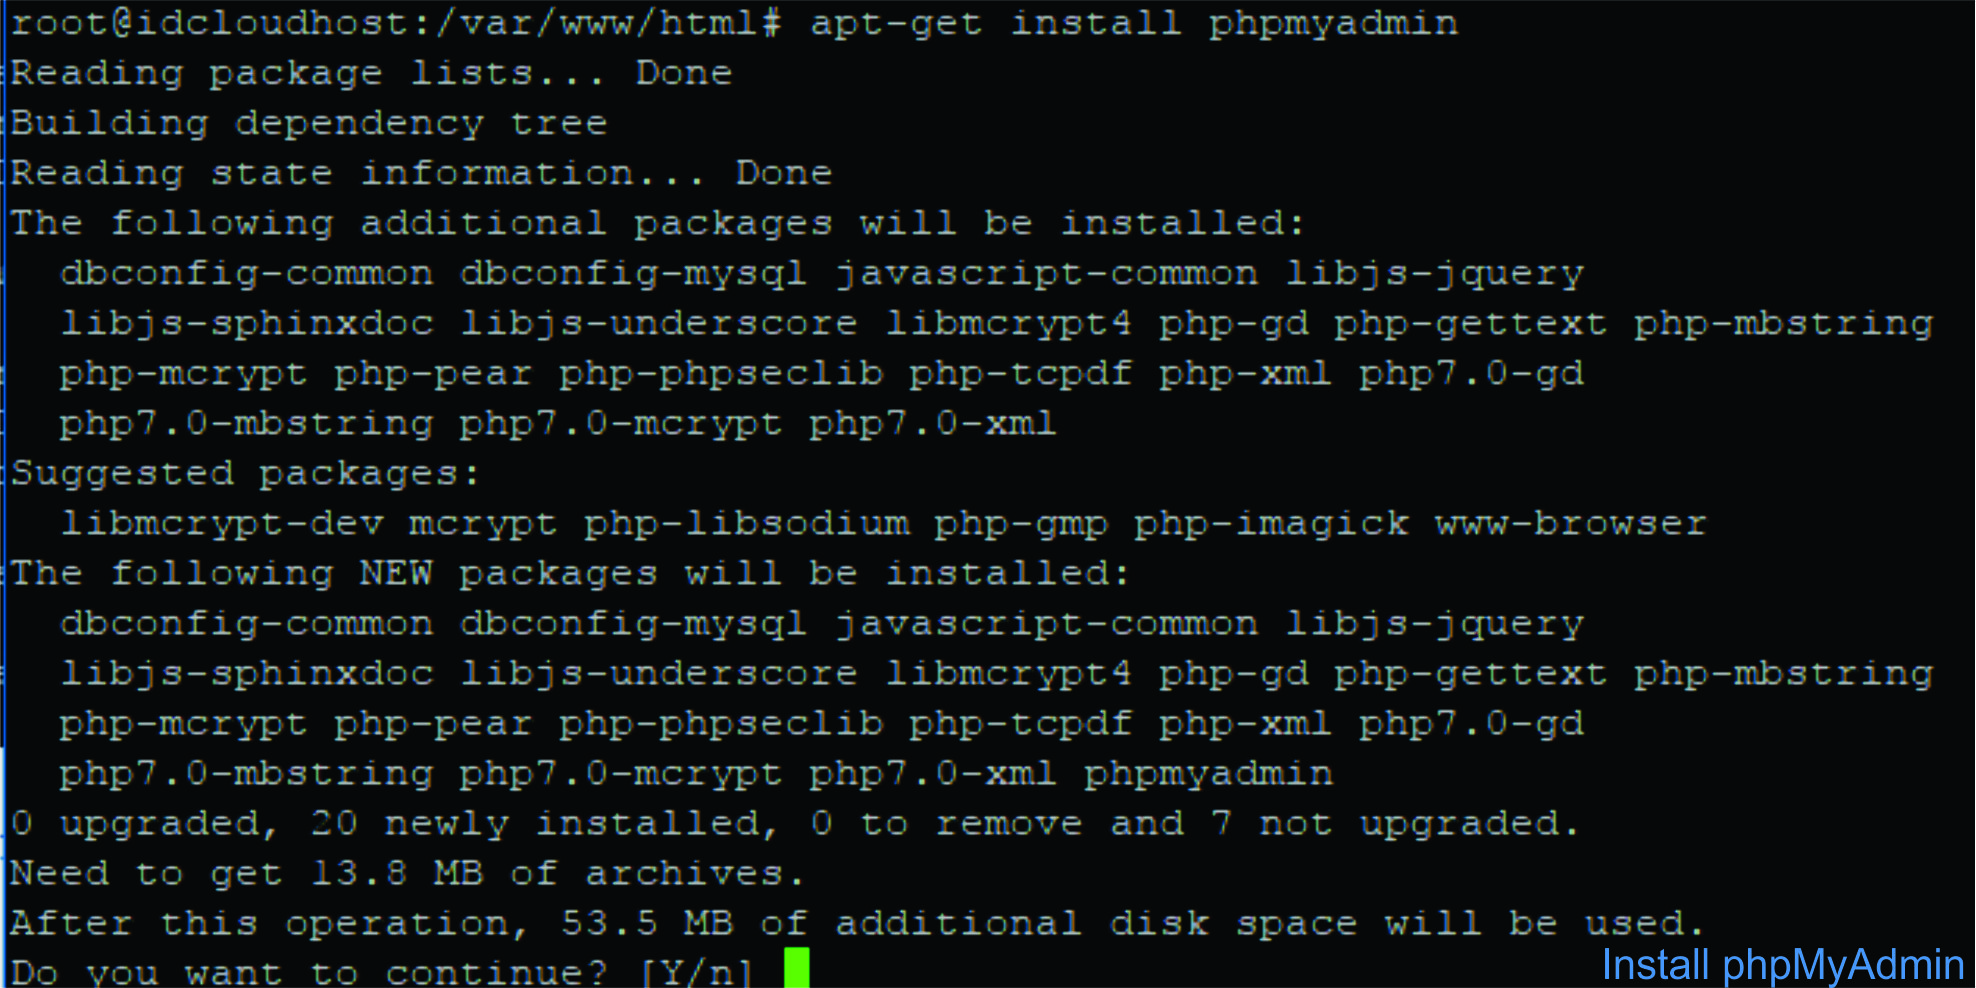
  2. Sekarang install phpMyAdmin dengan mengetikkan perintah berikut
    apt-get install phpmyadmin
    Cara Install phpMyAdmin di Ubuntu 16.04 LAMP
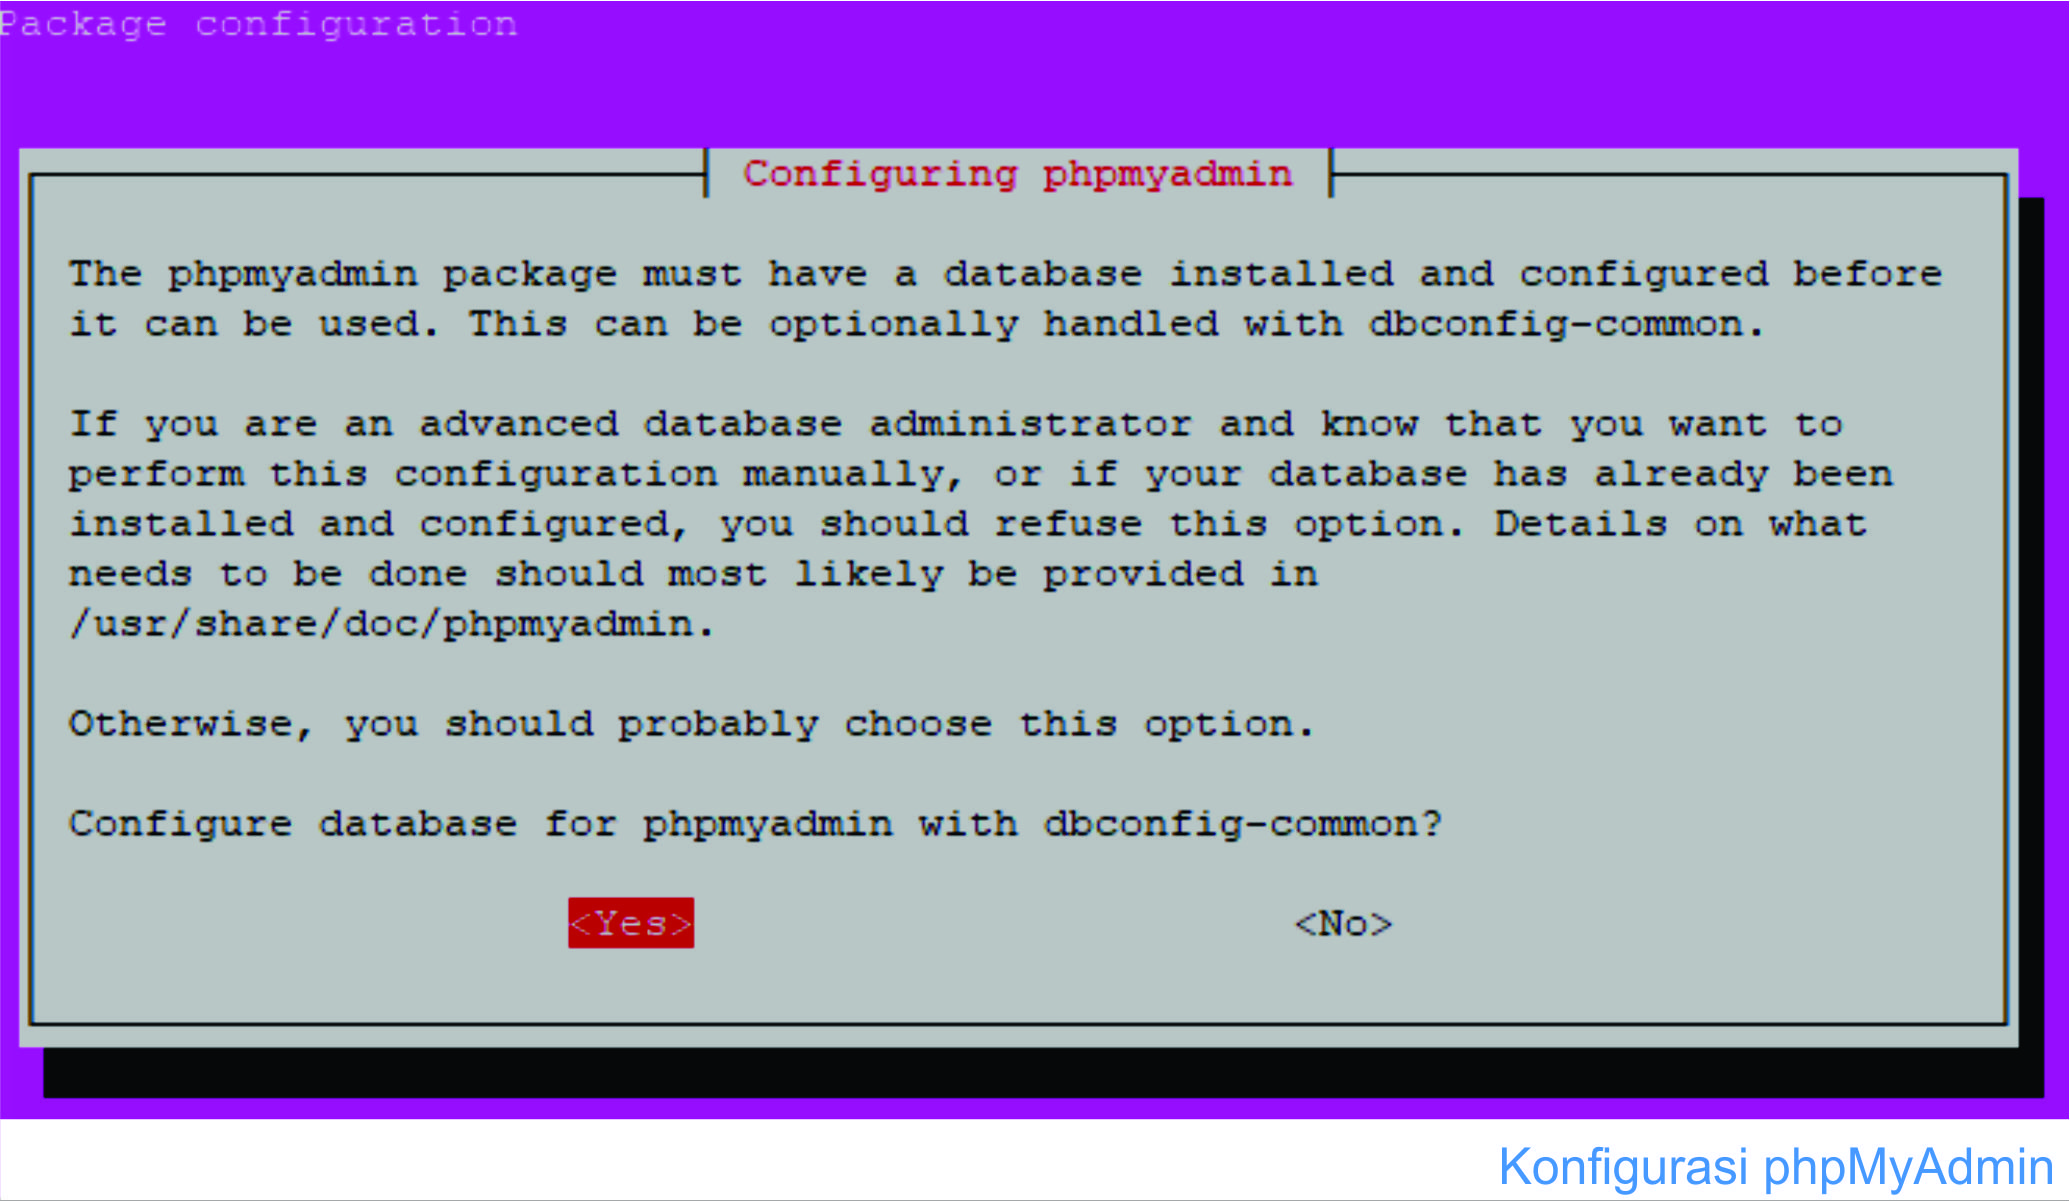
  3. Installer akan menanyakan opsi untuk menggunakan dbconfig-common untuk mengkonfigurasi phpMyAdmin. Pilih Yes.
    Cara Install phpMyAdmin di Ubuntu 16.04 LAMP
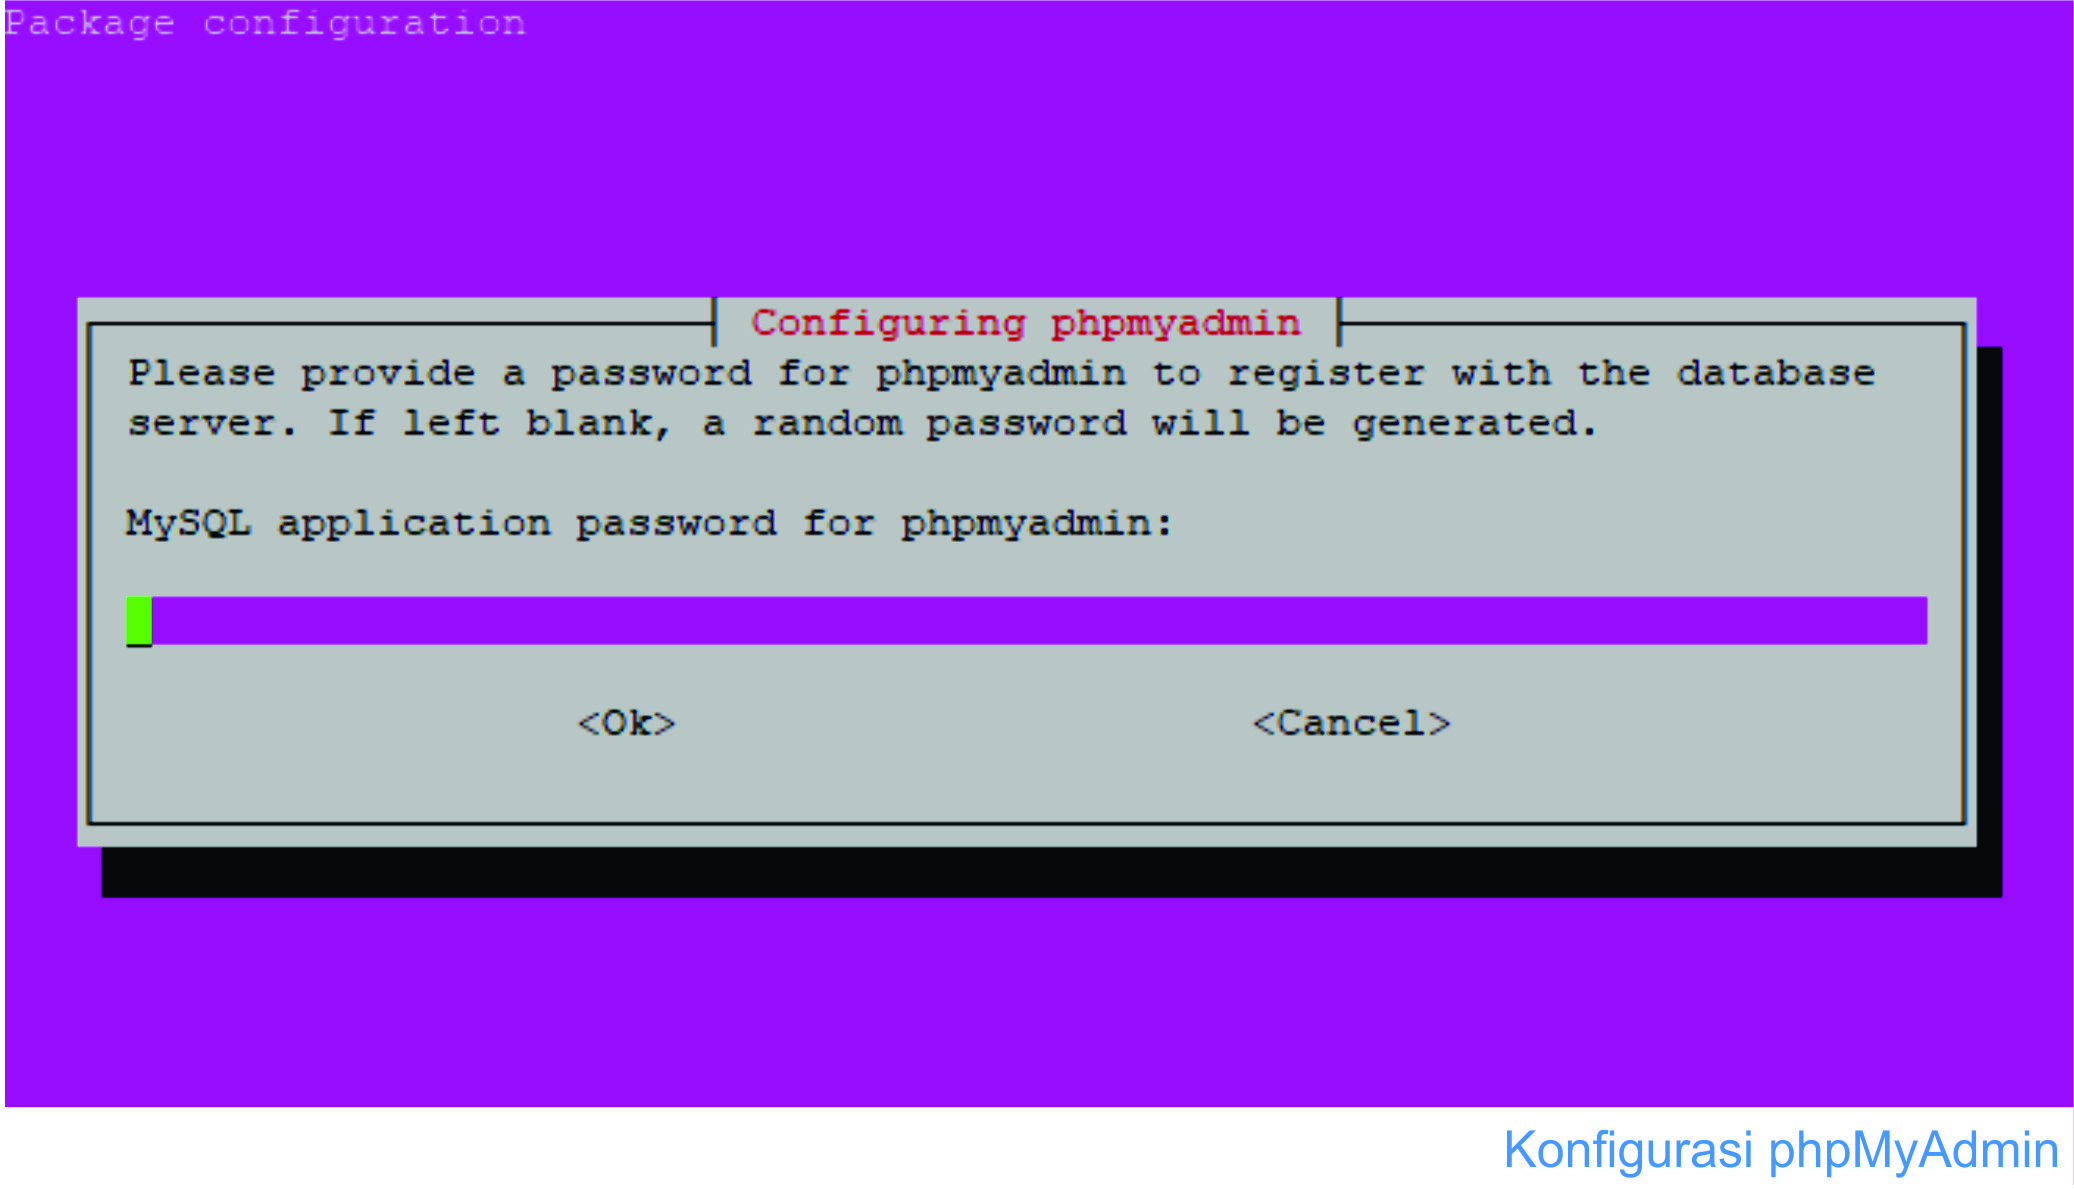
  4. Sekarang anda harus memasukkan password untuk database anda
    Cara Install phpMyAdmin di Ubuntu 16.04 LAMP
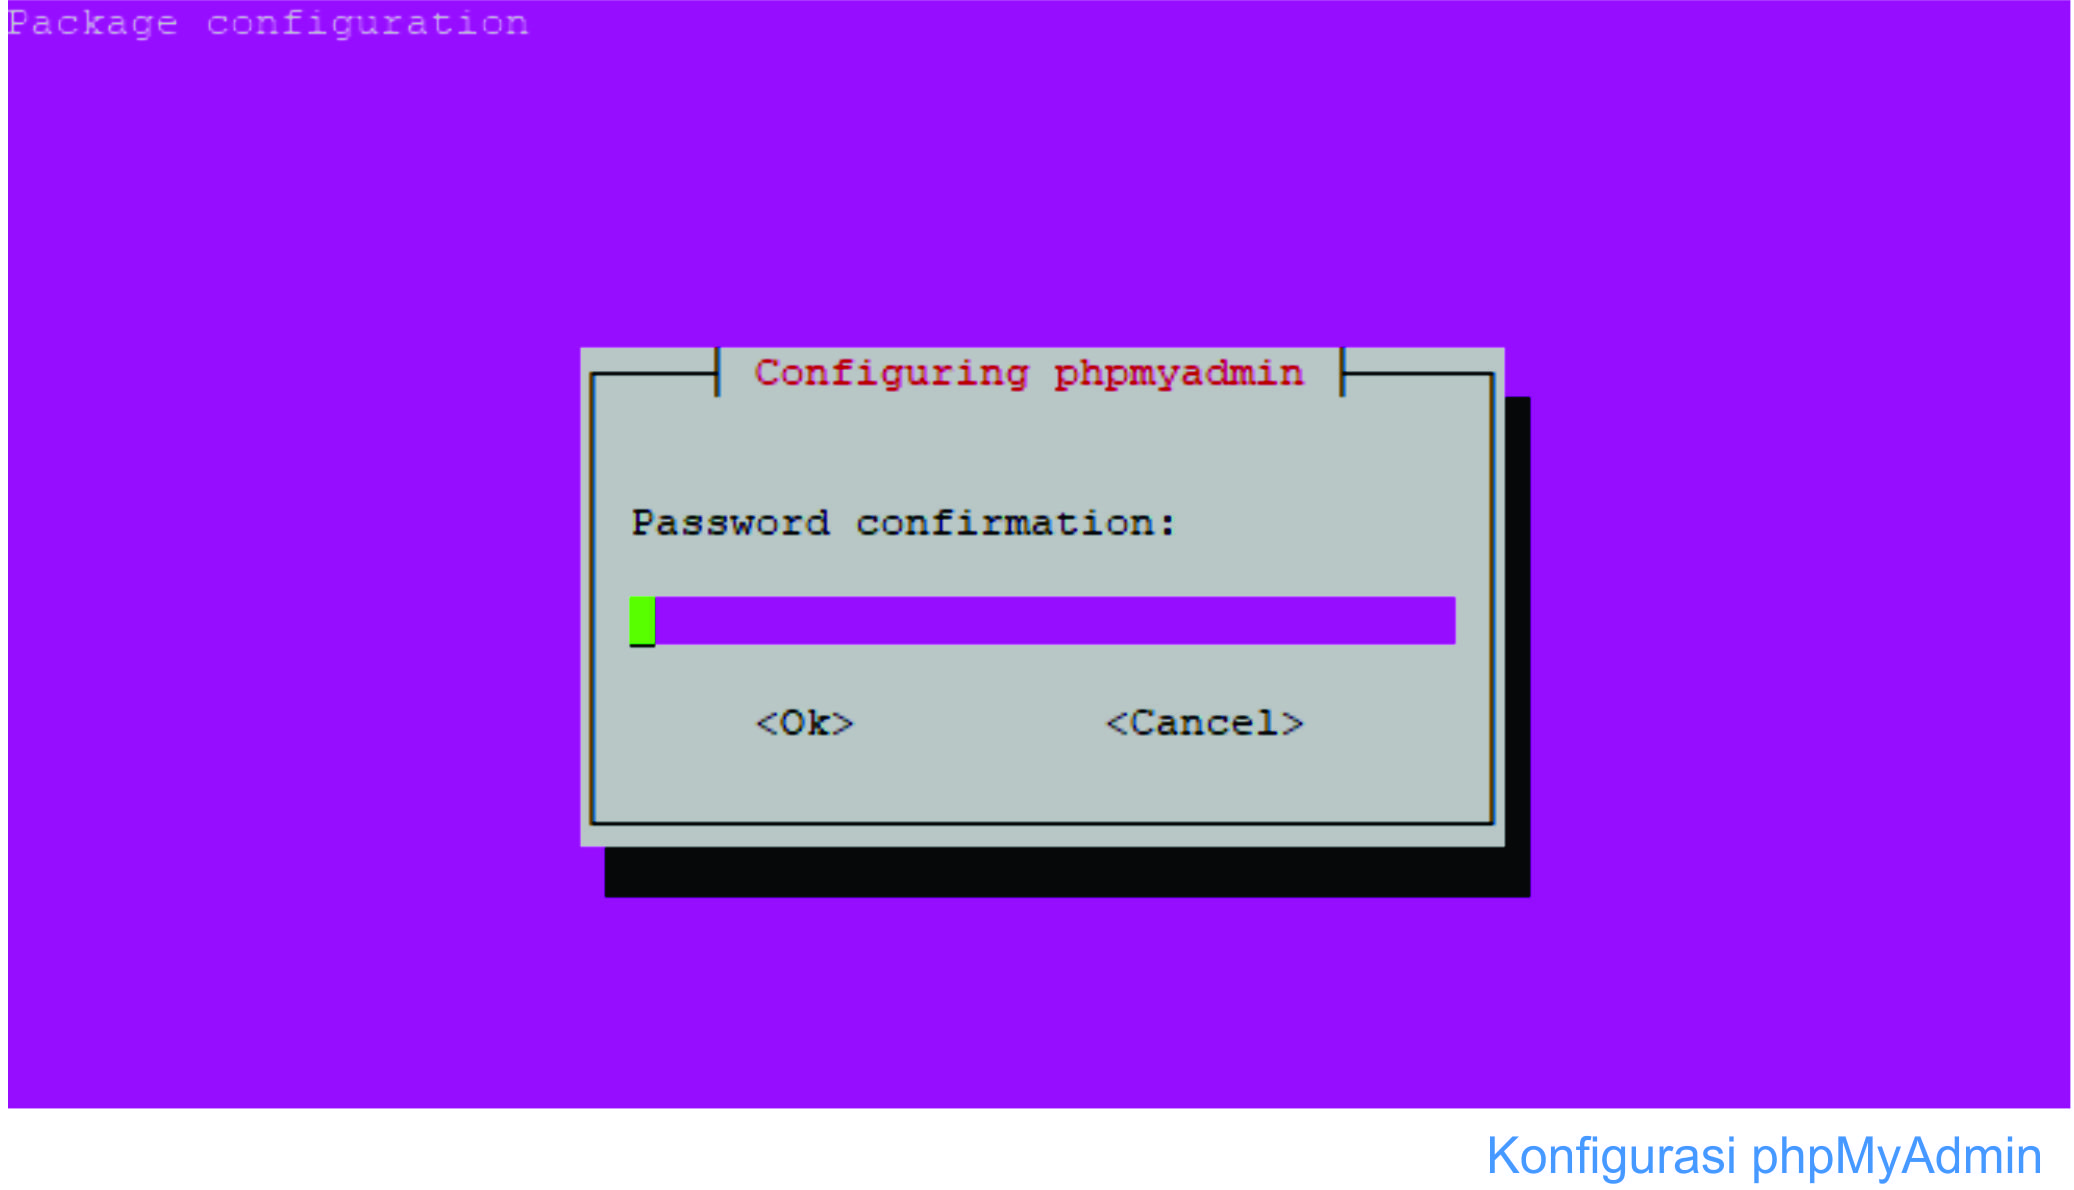
    Anda akan diminta mengkonfirmasi sekali lagi.
    Cara Install phpMyAdmin di Ubuntu 16.04 LAMP
  5. Setelah selesai, phpMyAdmin semestinya sudah terinstal, namun di beberapa kasus anda mungkin akan menemui pesan error yang berbunyi
    ERROR 1045 (28000) : Access denied for user ‘root’@’localhost’ (using password : NO). Your options are … (etc)
    Jika itu terjadi, ikuti langkah tambahan ini
    Pertama, pilih ‘abort’
    Kemudian login sebagai root menggunakan password anda ketika menginstal MariaDB
    mysql -u root -p
    Kemudian jalankan perintah ini
    CREATE DATABASE phpmyadmin;
    GRANT ALL ON phpmyadmin.* TO phpmyadmin@localhost IDENTIFIED BY ‘changethispassword’;
    \q
    Jangan lupa untuk mengganti changethispassword dengan password anda
    Selanjutnya, ubah konfigurasi database
    nano /etc/phpmyadmin/config-db.php
    Kemudian ubah parameter dbpass dengan password anda
    ##
    ## database access settings in php format
    ## automatically generated from /etc/dbconfig-common/phpmyadmin.conf
    ## by /usr/sbin/dbconfig-generate-include
    ##
    ## by default this file is managed via ucf, so you shouldn’t have to
    ## worry about manual changes being silently discarded. *however*,
    ## you’ll probably also want to edit the configuration file mentioned
    ## above too.
    ##
    $dbuser=’phpmyadmin’;
    $dbpass=’changethispassword’;
    $basepath=”;
    $dbname=’phpmyadmin’;
    $dbserver=’localhost’;
    $dbport=”;
    $dbtype=’mysql’;
    Ganti changethispassword dengan milik anda
    Kemudian simpan dengan menekan tombol Ctrl+O lalu Ctrl+X untuk keluar dari nano editor
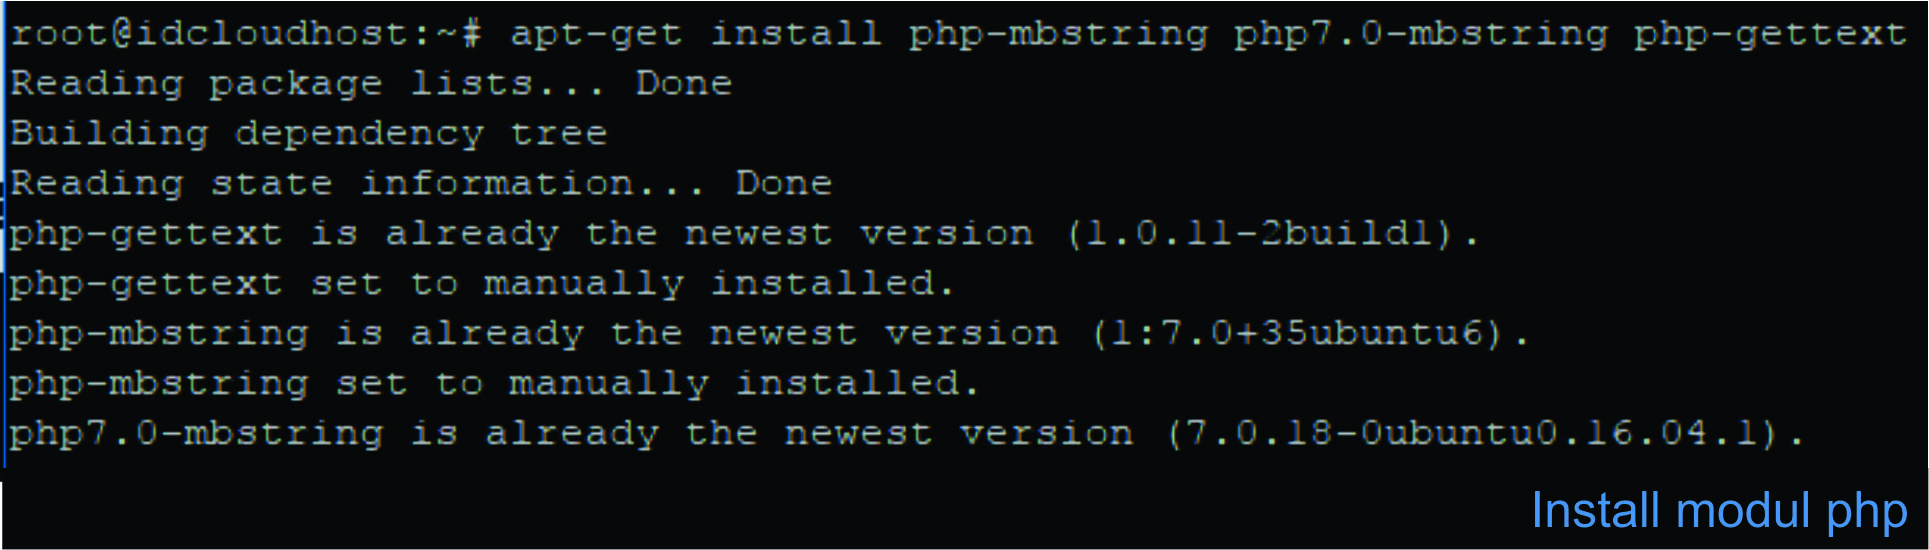
  6. Instal modul php yang dibutuhkan Karena tanpa itu phpmyadmin tidak akan bekerja
    Maka dari itu, masukkan perintah berikut
    apt-get install php-mbstring php7.0-mbstring php-gettext
    Cara Install phpMyAdmin di Ubuntu 16.04 LAMP
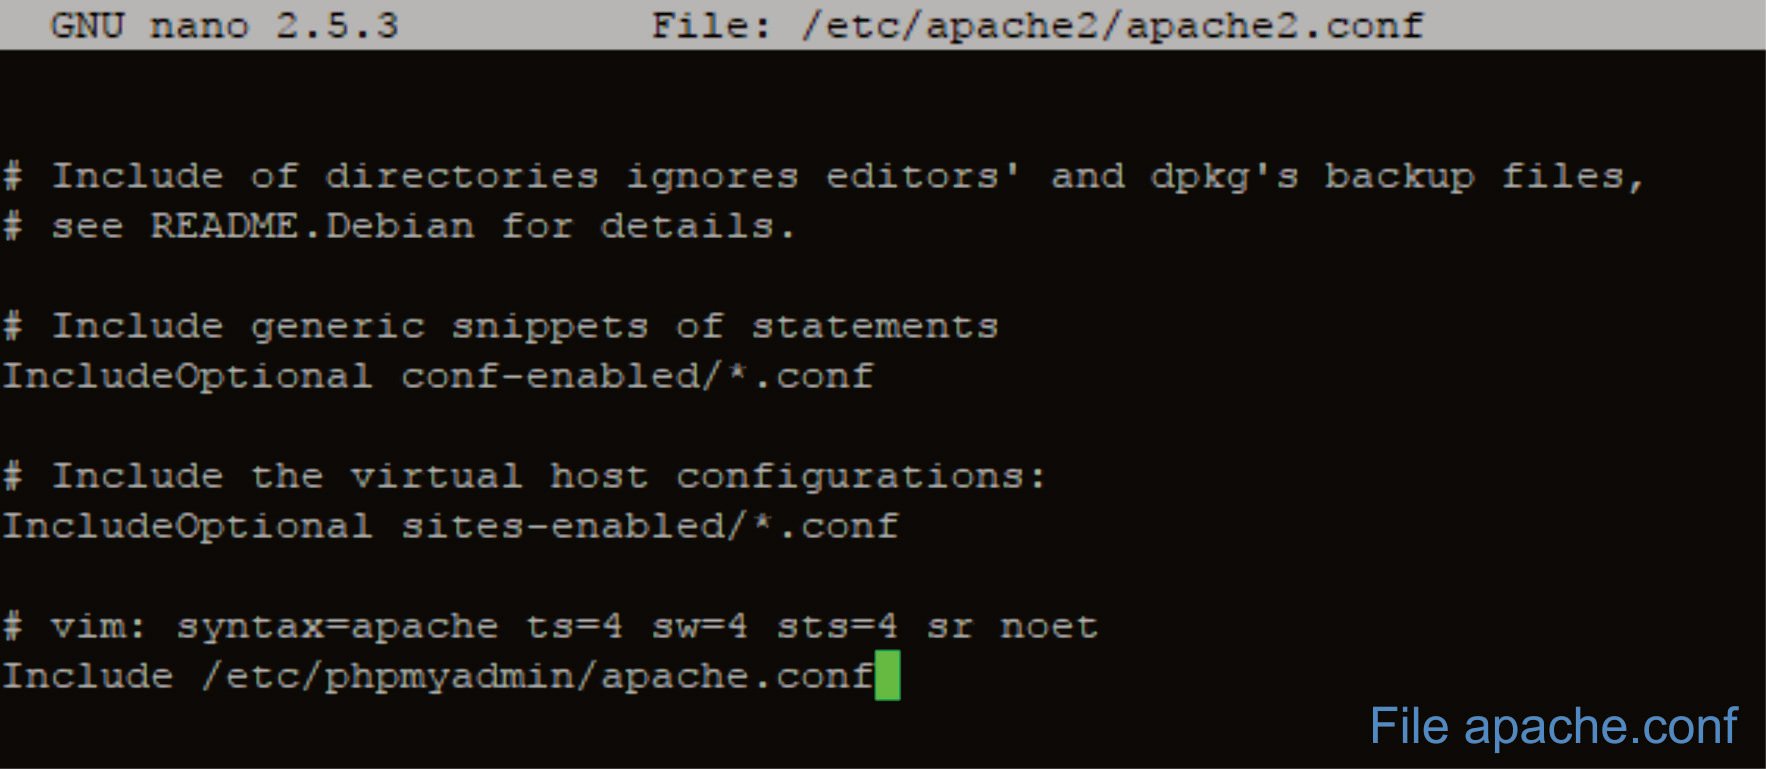
  7. Sesuaikan file config apache2 agar phpmyadmin dapat di akses
    nano /etc/apache2/apache2.conf
  8. Scroll file konfigurasi hingga ke dasar dan tambahkan kode berikut
    Include /etc/phpmyadmin/apache.conf
    Simpan perubahan dan keluar dari nano editor
    Cara Install phpMyAdmin di Ubuntu 16.04 LAMP
  9. Restart service apache2
    service apache2 restart
  10. Untuk mengeceknya, buka web browser dan coba akses phpmyadmin lewat URL
    http://x.x.x.x/phpmyadmin
    ganti x.x.x.x dengan IP address server anda
    Cara Install phpMyAdmin di Ubuntu 16.04 LAMP
    Gunakan credential berikut untuk login pertama
    • Username : root
    • Password : password yang dimasukkan ketika instalasi sebelumnya

    SUMBER / SOURCE

Installing Percona Server on Debian and Ubuntu

Installing Percona Server on Debian and Ubuntu

Ready-to-use packages are available from the Percona Server software repositories and the download page.
Supported Releases:
  • Debian:
  • 7.0 (wheezy)
  • 8.0 (jessie)
  • 9.0 (stretch)
  • Ubuntu:
  • 14.04LTS (trusty)
  • 16.04LTS (xenial)
  • 17.04 (zesty)
  • 17.10 (artful)
Supported Platforms:
  • x86
  • x86_64 (also known as amd64)

What’s in each DEB package?

The percona-server-server-5.7 package contains the database server itself, the mysqld binary and associated files.
The percona-server-common-5.7 package contains files common to the server and client.
The percona-server-client-5.7 package contains the command line client.
The percona-server-5.7-dbg package contains debug symbols for the server.
The percona-server-test-5.7 package contains the database test suite.
The percona-server-source-5.7 package contains the server source.
The libperconaserverclient20-dev package contains header files needed to compile software to use the client library.
The libperconaserverclient20 package contains the client shared library. The 18.1 is a reference to the version of the shared library. The version is incremented when there is a ABI change that requires software using the client library to be recompiled or its source code modified.

Installing Percona Server from Percona apt repository

  1. Fetch the repository packages from Percona web:
    wget https://repo.percona.com/apt/percona-release_0.1-4.$(lsb_release -sc)_all.deb
    
  2. Install the downloaded package with dpkg. To do that, run the following commands as root or with sudo:
    dpkg -i percona-release_0.1-4.$(lsb_release -sc)_all.deb
    
    Once you install this package the Percona repositories should be added. You can check the repository setup in the /etc/apt/sources.list.d/percona-release.list file.
  3. Remember to update the local cache:
    $ sudo apt-get update
    
  4. After that you can install the server package:
    $ sudo apt-get install percona-server-server-5.7
    
Note
Percona Server 5.7 comes with the TokuDB storage engine. You can find more information on how to install and enable the TokuDB storage in the TokuDB Installation guide.

Percona apt Testing repository

Percona offers pre-release builds from the testing repository. To enable it add the just uncomment the testing repository lines in the Percona repository definition in your repository file (default /etc/apt/sources.list.d/percona-release.list). It should looks like this (in this example VERSION is the name of your distribution):
# Testing & pre-release packages
#
deb http://repo.percona.com/apt VERSION testing
deb-src http://repo.percona.com/apt VERSION testing

Apt-Pinning the packages

In some cases you might need to “pin” the selected packages to avoid the upgrades from the distribution repositories. You’ll need to make a new file /etc/apt/preferences.d/00percona.pref and add the following lines in it:
Package: *
Pin: release o=Percona Development Team
Pin-Priority: 1001
For more information about the pinning you can check the official debian wiki.

Installing Percona Server using downloaded deb packages

Download the packages of the desired series for your architecture from the download page. The easiest way is to download bundle which contains all the packages. Following example will download Percona Server 5.7.10-3 release packages for Debian 8.0:
You should then unpack the bundle to get the packages:
$ tar xvf Percona-Server-5.7.10-3-r63dafaf-jessie-x86_64-bundle.tar
After you unpack the bundle you should see the following packages:
$ ls *.deb
libperconaserverclient20-dev_5.7.10-3-1.jessie_amd64.deb
libperconaserverclient20_5.7.10-3-1.jessie_amd64.deb
percona-server-5.7-dbg_5.7.10-3-1.jessie_amd64.deb
percona-server-client-5.7_5.7.10-3-1.jessie_amd64.deb
percona-server-common-5.7_5.7.10-3-1.jessie_amd64.deb
percona-server-server-5.7_5.7.10-3-1.jessie_amd64.deb
percona-server-source-5.7_5.7.10-3-1.jessie_amd64.deb
percona-server-test-5.7_5.7.10-3-1.jessie_amd64.deb
percona-server-tokudb-5.7_5.7.10-3-1.jessie_amd64.deb
Now you can install Percona Server by running:
$ sudo dpkg -i *.deb
This will install all the packages from the bundle. Another option is to download/specify only the packages you need for running Percona Server installation (libperconaserverclient20_5.7.10-3-1.jessie_amd64.deb, percona-server-client-5.7_5.7.10-3-1.jessie_amd64.deb, percona-server-common-5.7_5.7.10-3-1.jessie_amd64.deb, and percona-server-server-5.7_5.7.10-3-1.jessie_amd64.deb. Optionally you can install percona-server-tokudb-5.7_5.7.10-3-1.jessie_amd64.deb if you want TokuDB storage engine).
Note
Percona Server 5.7 comes with the TokuDB storage engine. You can find more information on how to install and enable the TokuDB storage in the TokuDB Installation guide.
Warning
When installing packages manually like this, you’ll need to make sure to resolve all the dependencies and install missing packages yourself. Following packages will need to be installed before you can manually install Percona Server: mysql-common, libjemalloc1, libaio1 and libmecab2

Running Percona Server

Percona Server stores the data files in /var/lib/mysql/ by default. You can find the configuration file that is used to manage Percona Server in /etc/mysql/my.cnf.
Note
Debian and Ubuntu installation doesn’t automatically create a special debian-sys-maint user which can be used by the control scripts to control the Percona Server mysqld and mysqld_safe services like it was the case with previous Percona Server versions. If you still require this user you’ll need to create it manually.
  1. Starting the service
    Percona Server is started automatically after it gets installed unless it encounters errors during the installation process. You can also manually start it by running:
    $ sudo service mysql start
    
  2. Confirming that service is running
    You can check the service status by running:
    $ service mysql status
    
  3. Stopping the service
    You can stop the service by running:
    $ sudo service mysql stop
    
  4. Restarting the service
    You can restart the service by running:
    $ sudo service mysql restart
    
Note
Debian 8.0 (jessie) and Ubuntu 15.04 (vivid) come with systemd as the default system and service manager so you can invoke all the above commands with sytemctl instead of service. Currently both are supported.

Uninstalling Percona Server

To uninstall Percona Server you’ll need to remove all the installed packages. Removing packages with apt-get remove will leave the configuration and data files. Removing the packages with apt-get purge will remove all the packages with configuration files and data files (all the databases). Depending on your needs you can choose which command better suits you.
  1. Stop the Percona Server service
    $ sudo service mysql stop
    
  2. Remove the packages
    1. Remove the packages. This will leave the data files (databases, tables, logs, configuration, etc.) behind. In case you don’t need them you’ll need to remove them manually.
    $ sudo apt-get remove percona-server*
    
    1. Purge the packages. NOTE: This will remove all the packages and delete all the data files (databases, tables, logs, etc.)
    $ sudo apt-get purge percona-server*
    

SUMBER / SOURCE

Tuesday, April 3, 2018

CARA INSTALL PRINTER HP DI LINUX MINT - Install HP Printer drivers in Ubuntu, Linux Mint, and elementary OS

Install HP Printer drivers in Ubuntu, Linux Mint, and elementary OS


HP Linux Imaging and Printing (HPLIP) is an HP-developed application for printing, scanning, and faxing with HP inkjet and laser based printers connected to Linux computers. The HPLIP  includes print, scan and fax support for 2594 printer models, including Deskjet, Officejet, Photosmart, PSC (Print Scan Copy), Business Inkjet, LaserJet, Edgeline MFP, and LaserJet MFP.

Check if HPLIP is already installed

Most of recent Linux distros come preinstalled with a version of HPLIP, but it’s possible that you may not have latest one. It’s a good idea to first check if at all your PC already has the latest HPLIP installed or not.


Launch ‘Terminal’ and enter the following command in it.
dpkg -l hplip

Uninstall HPLIP

If this version is not the latest, you can simply uninstall it and install the latest version as described below. Even if you proceed without uninstalling, the HPLIP installer will prompt you that there is already a version available and you can then choose to remove the old and install the latest package. This command will remove HPLIP from your PC.
dpkg -r hplip
Before you start installing HPLIP, I suggest to confirm if your HP printer is compatible to this application. You can look up your exact HP model number compatibility at their official webpage.

Install HP Linux Imaging and Printing in Ubuntu, Linux Mint, and elementary OS

This guide will also serve as a reference for those who want to reinstall HP drivers due to corrupted programs and broken packages.
STEP 1: Go to official HP sourceforge webpage and download the HPLIP installer package. It should look something like hplip-3.16.11.run. Version number may be different in your case.
STEP 2: Go to ‘Applications’ or ‘Menu’ and launch ‘Terminal’.
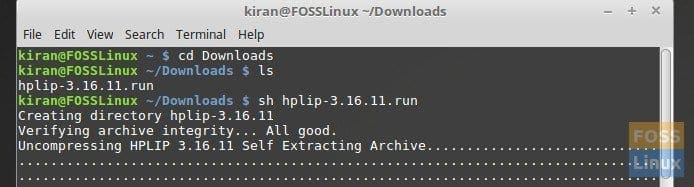
STEP 3: I’m assuming that the downloaded hplip-3.16.11.run installer is in ‘Downloads’ directory. Navigate into it using cd command:
cd Downloads
HPLIP Installation
HPLIP Installation
STEP 4:  Use list command to see the contents of the ‘Downloads’ directory.
ls
STEP 5: Run the installer using sh command
sh hplip-3.16.11.run
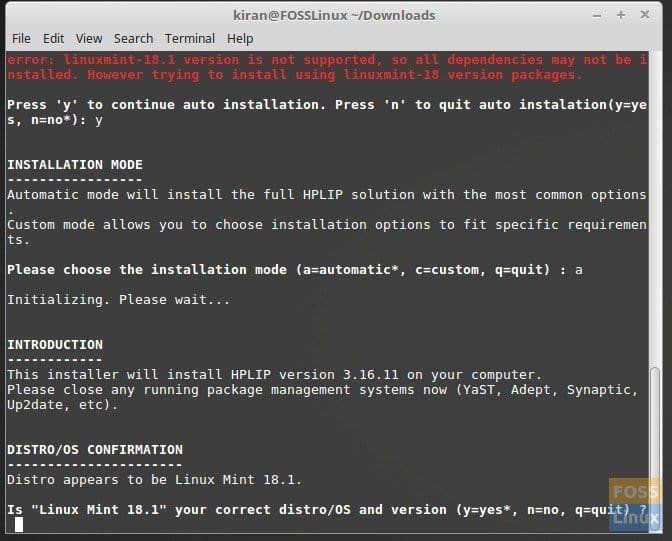
STEP 6: Pay attention to ‘Terminal’ progress. Type ‘y’ and hit enter for automatic installation prompt followed by ‘a’.
STEP 7: It will confirm your current Linux distro. Enter ‘y’ and hit enter.
Linux Mint Terminal showing HPLIP installation
STEP 8: Enter your root password to continue installation.
STEP 9: Press enter to continue.
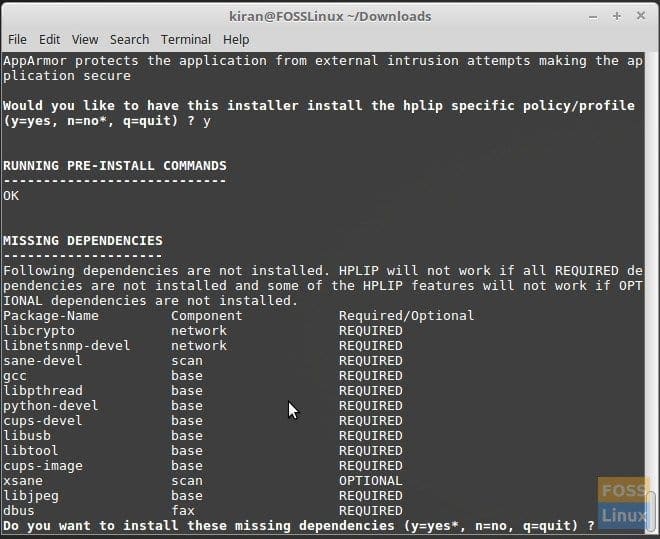
STEP 10: It will ask if would you like to have this installer install the hplip specific policy/profile. Type ‘y’ and continue.
STEP 11: In this step it will show you dependencies that are not installed. HPLIP will not work if all REQUIRED dependencies are not installed and some of the HPLIP features will not work if OPTIONAL dependencies are not installed. Go ahead and type ‘y’.
Terminal showing Dependencies of HPLIP
STEP 12: The installer will no automatically run dpkg command for each of the dependencies to download and install them. You need to have internet connection.
STEP 13: If your PC already has HPLIP installed, the installer will prompt you whether to remove and install or quit installation. If you are upgrading HPLIP or reinstalling HPLIP, you should continue to remove and install.
STEP 14: The installer will automatically compile the package for you and run the commands ‘./configure’ and ‘make’. You don’t need to do anything.
STEP 15: Enter ‘y’ when it prompts to keep HPLIP updated.
STEP 16: Printer drivers and imaging application should be complete by this stage. From next step onward, it’s more of connecting your computer to printer and get things working. Quitting any of below steps won’t break drivers and applications that are already installed.
STEP 15: Your HP printer must now be connected to your PC and switched ON to continue from here in GUI mode. Enter ‘u’ and continue in GUI mode.
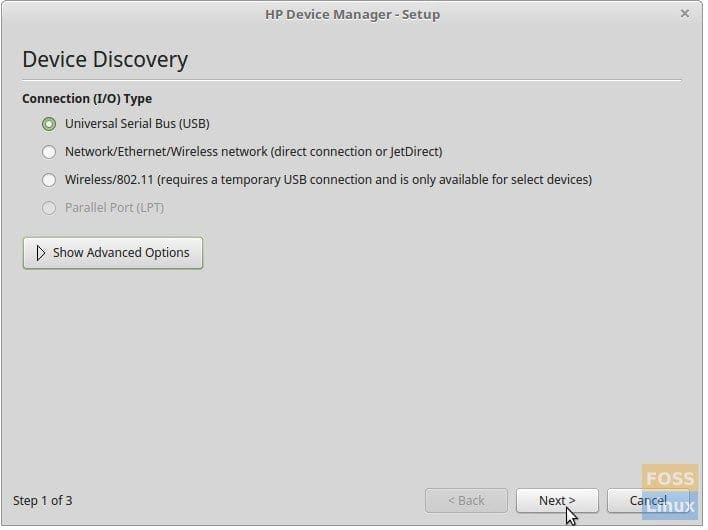
STEP 16: Select Printer connection type.
Printer Connection Type
STEP 17: Select the Printer to be configured.
STEP 18: Select the PPD file (or driver) to be used for your Printer. The PPD files which are nothing but drivers which are most similar to your printer are displayed. Select the appropriate PPD file for your printer.
STEP 19: Confirm the Printer Settings and finish the configuration process.
STEP 20: Click  ‘AddPrinter’ to complete the printer setup process.
This application is released by HP as free and open source software (FOSS). You won’t get a official support, but informal support is open in their launchpad website just in case if you happened to have any questions.

SOURCE / SUMBER

Wednesday, March 28, 2018

CARA INSTALL GOOGLE DRIVE DI LINUX MINT - How To mount and use your Googledrive in Linux Mint Cinnamon 18

How To mount and use your Googledrive in Linux Mint Cinnamon 18
and other on Ubuntu based Linux                                  TuX on Gdrive       

This short tutorial was created for Mint newcomers which own a Gmail account and have no idea how to access their Googledrive in Linux Mint.
It was made simple as possible, inspired by the detailed "How to mount Google Drive on Linux" -
all credits goes to Dan Nanni on Xmodulo.com and the developer Allessandro Strada

How To ...
Copy and paste following commands into your terminal,
without the   ~ $  or   #   and the following space,
f.e. for "~ $ sudo apt-get update"  - you just copy and paste   sudo apt-get update

Additional info for the newcomer: Terminal signs and their meaning:
~ $ = you are logged in as user - at your home directory (!)

 #  = you are logged in as root - (with the command pwd you can see, where you are) 

This manual was tested well under different circumstances on several Intel Machines, running Linux Mint 18 Cinnamon 64 bit (Sarah);Kernel 4.40-47 ; Cinnamon Version 3.0.7

Unfortunately this was neccessary because Sarah still lacks a client for Googledrive :-|

So here we are using a ppa, which is not an officially recommended way to add software because of possible security leaks.

If you can still live & sleep with this knowledge, like the author does very well, you can continue from here.
If you are one of these paranoid friends - you have to wait for a better solution -
but if you were paranoid - you would not use Google, don't ya ...

Here we go, don't worry it isn't any complicated,
just follow the instructions and clone the the actions as shown.


NOTE: You have to put your real username in the spaces where you see "username"

Open a terminal:

= username@yourcomputer ~ $
    (next:)
~ $ su
= Password:
(enter your [root] password and hit enter - note - there is no visual effect)
= YourComputer username #
    (next:)
 # apt-add-repository ppa:alessandro-strada/ppa
    (your action: confirm ; next:)
 # apt update
    (next:)
 # apt install google-drive-ocamlfuse
    (your action: confirm ; next:)
 # groupadd fuse
    (next:)
 # usermod -a -G fuse username
    (next:)
 # exit
    then close the terminal-window.
__  

Open a NEW terminal (with your username - not as root !)
= username@yourcomputer ~ $
    (next:)
~ $ exec su -l $USER
= Password:
(enter your password and hit enter - note - there is no visual effect)
    (next:)


At this point quit your browser - Firefox by default;
shut all windows _NOW_ (important!)

    (next:)
~ $ google-drive-ocamlfuse

    Now Firefox (by system default) will open up a window,
    asking you to log in to your Google account.
    Log in with your Google account with name and password.
    After logging in, Google is requesting for permission.
    Click on "Accept".
    Next you have to grant access to your Google account.
    Click on "Allow".
    Then you should see a message saying that google-drive-       ocamlfuse was
    successfully granted access.
    Important:
    Close the Firefox tab / window  NOW  - to finalize the    
procedure.
    After you will see this feedback in your terminal-window:

= Access token retrieved correctly.

    Now a mount point needs to be created,
    for that you can access to your Googledrive as a mounted volume,
    it will appear in the window of your "Files" manager
    (in Cinnamon = Nemo, by default):


~ $ mkdir ~/googledrive
    (no feedback; next:)
~ $ google-drive-ocamlfuse ~/googledrive
    (no feedback; next:)
~ $ mount
= a lot of feedback; the LAST line should look like this:
    "google-drive-ocamlfuse on /home/username/googledrive type fuse.google-drive-ocamlfuse
    (rw,nosuid,nodev,relatime,user_id=1001,group_id=1002)"
    (the handcrafting on the terminal is done for now, and so next:)

~ $ exit
___

Open your File Manager, for Cinnamon it is called "Files" News- the internal name is "Nemo"

Now you should see your "googledrive" - additional attached as a volume in your filemanger,
you can use it like an usual attached device, like an USB stick, f.e.
_
It will be available until you shutdown/restart your system.

If you wish to disconnect your googledrive manually, paste this command in a terminal:
~ $ fusermount -u ~/googledrive

If you wish to connect your googledrive manually, paste this command in a terminal:
~ $  google-drive-ocamlfuse ~/googledrive


A little comfort: Just double-click a file for mount / unmount :
Optional you can go ahead and create a simple mount
and a simple un-mount script on an easy way:
 
For mounting googledrive by your request:
  1. Create a new document with gedit.
  2. Paste in: google-drive-ocamlfuse ~/googledrive
  3. Safe as f.e: Mount Googledrive  on a certain destination, f.e. desktop
  4. Close gedit.
  5. Locate the file and right-click on it,
     choose properties;
  6. click on access-rights
  7. Mark the field "allow executing as application"
  8. Close the properties window
  9. Double-click your file
 10. Choose  execute  on upcoming window =
     googledrive becomes available / getting mounted
 
For UN-mounting googledrive by your request:
  1. Create a new document with gedit.
  2. Paste in: fusermount -u ~/googledrive
  3. Safe as f.e: Unmount Googledrive  on a certain destination, f.e. desktop
  4. Close gedit.
  5. Locate the file and right-click on it,
     choose properties;
  6. click on access-rights
  7. Mark the field "allow executing as application"
  8. Close the properties window
  9. Double-click your file
 10. Choose  execute  on upcoming window =

     googledrive gets disconnected / unmounted

Note: You can safe/move these both files to any destination
      inside your home directory you like


Note: Known Bug (moderate):
If you are using the 'scripts' from above -
make sure that you have only one Nemo window open -
otherwise the unmount command will fail.

News:
No more issues with Dropbox at the same time with GoogleDrive.


SOURCE / SUMBER

Friday, November 24, 2017

Welcome Back Mozilla FireFox Quantum 57.0 Final Offline Installer

Welcome Back Mozilla FireFox Quantum 57.0 Final Offline Installer


Mozilla FireFox Final

Mozilla FireFox Final

Hii Guys Welcome Back Mozilla Firefox Quantum Edisi Teranyar. Mozilla adalah salah satu browser paling populer saat ini selain Internet Exploer, Safari, UC Browser, Microsoft Edge dan tentu saja Google Chrome sang idola. Mozilla Firefox saat ini menawarkan berbagai macam fitur mulai dari kecepatan, privasi, serta proteksi super dari serangan dunia maya. Firefox juga memiliki tampilan yang mudah digunakan, selain itu Mozilla Firefox juga sudah mendukung Bahasa Indonesia. Kalian juga bisa menggunakan ribuan add-ons yang tersedia untuk Mozilla Firefox. Mozilla Firefox juga sudah mendukung berbagai macam sistem mulai dari Windows, Linux, MacOS hingga Android.


NO PASSWORD !


Tuesday, July 12, 2016

CARA MEMBUAT HOTSPOT TETHERING DARI LAPTOP

Untuk mempersingkat waktu kita langsung saja untuk lanjut kelangkah ? langkahnya :
  • Buka CMD ( Command Prompt ) via Administrator kemudian ketikan sintak dibawah ini :
  • Jika sukses akan muncul seperti dibawah ini :
    The hosted network mode has been set to allow.
    The SSID of the hosted network has been successfully changed.
    The user key passphrase of the hosted network has been successfully changed.
    NB?: Kode diatas bermaksud untuk membuat Virtual Wifi. SSID adalah nama hotspot/wifi anda dan Key adalah password agar dapat terhubgung ke Hotspot laptop anda.
  • Setelah anda membuat?Virtual Wifi?silahkan jalankan Hotspot laptop anda dengan sintak dibawah ini : Note: Pastikan Wifi laptop sudah anda nyalakan.
Selesai sudah kita?membuat hotspot dengan laptop tanpa software, namun dipastikan laptop client atau siapapun yang terkoneksi ke Hotspot anda belum bisa digunakan untuk surfing ke internet. Sehingga masih ada beberapa tahap lagi agar client yang terkoneksi ke hotspot dapat terkoneksi ke internet.
Silahkan menuju?START>Control PanelNetwork and InternetNetwork Connections.
Perhatikan disana apakah ada Network Connection baru ?? Jika ada pasti muncul?Microsoft Virtual WiFi Miniport Adapter?dengan nama?Wireless Network Connection 2biasanya.?Wireless Network Connection 2 inilah yang akan menjadi perantara antara koneksi kita ke hotspot.
Klik kanan pada koneksi kita yang akan di sharing menggunakan hotspot (disini saya pakaiZTE Wireless Terminal)?dan pilih?Properties.?Menuju ke tab?Sharing?dan beri checklist pada?Allow other network users to connect through? ??dan pilih?Wireless Network Connection 2?kemudian klik?OK.
NB?: Jika client yang terkoneksi ke server ( Hotspot laptop anda) coba rekonekkan (diskonek-koneksikan kembali) dulu koneksi internet di laptop anda.
Setiap kali laptop di nyalakan atau di restart maka hotspot akan mati dan perlu dinyalakan dengan cara manual seperti diatas menggunakan cmd.

SOURCE/SUMBER

Tuesday, February 2, 2016

Cara Mematikan Automatic Update di Windows 10

5 Cara Mematikan Automatic Update di Windows 10 Secara Paksa (Demi Menghemat Kuota Internet


Seperti Inilah Evolusi Start Menu dari Windows 95 Hingga Windows 10
Windows 10 dengan segudang fitur barunya memang sangat keren, tetapi di satu sisi OS ini juga mimpi buruk bagi kamu yang memiliki kuota internet pas-pasan. Hal ini karena fitur Automatic Update di Windows 10 secara default tidak bisa dimatikan, khususnya di Windows 10 Home. (Baca juga: Fitur Automatic Update Tidak Bisa Dimatikan di Windows 10 Home)
Untuk itu di seri Windows 10 Tips kali ini kita akan memberikan 5 cara mematikan Automatic Update di Windows 10 secara paksa demi menghemat kuota internet.

Tentu saja ini tidak kita rekomendasikan bagi kamu yang kuota internetnya unlimited, karena update dari Microsoft cukup penting (kadang perbaikan bugs, peningkatan fungsionalitas fitur, atau patch security). Tetapi bagi kamu yang kuota internetnya kembang-kempis, boleh mengikuti trik ini.

Cara Halus #1 — Menggunakan Defer Upgrade

Pertama khusus bagi kamu pengguna Windows 10 Pro, kamu bisa mematikan automatic update secara halus melalui opsi Defer Upgrade.
Defer Upgrade artinya meminta Windows 10 untuk tidak mendownload dan menginstall update dalam jangka waktu hingga maksimal 8 bulan.
Kelebihan Defer Upgrade, kamu bakal tetap akan mendapatkan patch security sehingga Windows 10 kamu tetap aman, tetapi untuk update berupa fitur baru dan peningkatan fitur bakal tidak didownload sehingga kuota kamu bisa lebih hemat.
Nantinya kamu tinggal matikan Defer Upgrade dan melakukan Check Updates begitu terhubung dengan koneksi berkuota melimpah. Simple sekali khan?
Untuk mengaktifkan Defer Upgrade, buka Windows Update > Advanced Options
5 Cara Mematikan Automatic Update di Windows 10 Secara Paksa (Demi Menghemat Kuota Internet) — Tips #15

Setelah itu tinggal centang aja Defer Upgrade.

Tetapi ingat, opsi ini hanya ada di Windows 10 Pro saja. Bagi kamu pengguna Windows 10 Home tidak bisa melakukan cara halus ini.

Cara Halus #2 — Menggunakan Metered Connection

Cara halus lainnya adalah mengatur koneksi sebagai metered connection, dengan begitu Windows tidak akan mendownload update sampai kamu terhubung ke koneksi yang non-metered.
Namun cara ini hanya bisa dilakukan oleh pengguna Windows 10 yang menggunakan koneksi WiFi atau Mobile Broadband.
Untuk melakukannya cukup buka Settings dengan menekan CTRL + I > Network & Internet
5 Cara Mematikan Automatic Update di Windows 10 Secara Paksa (Demi Menghemat Kuota Internet) — Tips #15

Setelah itu pilih koneksi WiFi atau Mobile Broadband kamu > Advanced Options > dan akutfkan opsi Set as metered connection.
5 Cara Mematikan Automatic Update di Windows 10 Secara Paksa (Demi Menghemat Kuota Internet) — Tips #15

Cara Paksa #3 — Mematikan Services Windows Update

Dengan cara ini Windows Update akan mati total, termasuk juga update untuk patch security. Jadi pastikan jika kamu menggunakan cara ini, begitu terhubung ke internet dengan kuota melimpah segera lakukan update agar Windows kamu tetap secure dan optimal.
Untuk mematikan automatic update di Windows 10 dengan cara mematikan services nya, langsung saja buka Services.
5 Cara Mematikan Automatic Update di Windows 10 Secara Paksa (Demi Menghemat Kuota Internet) — Tips #15

Setelah itu cari Windos Update > Klik kanan > Properties
5 Cara Mematikan Automatic Update di Windows 10 Secara Paksa (Demi Menghemat Kuota Internet) — Tips #15

Setelah itu Stop Windows Update Services tersebut dan ubah opsi Startup type ke Disabled.
5 Cara Mematikan Automatic Update di Windows 10 Secara Paksa (Demi Menghemat Kuota Internet) — Tips #15

NB: Mematikan Windows Update Services bisa membuat kamu tidak bisa menggunakan Store dan tidak bisa mendownload Modern Apps. Resiko ditanggung penumpang.

Cara Paksa #4 — Modifikasi Melalui Group Policy

Cara ini hanya bisa dilakukan oleh pengguna Windows 10 Pro yang memiliki akses terhadap Group Policy. Cukup buka Run dengan Win + R > ketikkan gpedit.msc > Enter
5 Cara Mematikan Automatic Update di Windows 10 Secara Paksa (Demi Menghemat Kuota Internet) — Tips #15

Browse ke Computer Configuration > Administrative Templates > Windows Components > Windows Update.
Lalu klik kanan Configure Automatic Update > Edit
5 Cara Mematikan Automatic Update di Windows 10 Secara Paksa (Demi Menghemat Kuota Internet) — Tips #15

Setelah itu pilih opsi Enabled dan ubah automatic updating configuration ke Notify for download and notify for install > OK dan Apply
5 Cara Mematikan Automatic Update di Windows 10 Secara Paksa (Demi Menghemat Kuota Internet) — Tips #15


Dengan begitu jika ada update yang dirilis, Windows 10 tidak akan langsung download, melainkan akan memberi notifikasi terlebih dahulu.

Cara Paksa #5 — Melalui Command PowerShell

Sebenarnya ini merupakan shortcut dari cara paksa #3, hanya saja kita buat dalam bentuk powershell command agar kamu bisa mengaksesnya dengan lebih cepat.
Untuk mematikan Windows Update service, cukup buka PowerShell dan eksekusi command berikut ini:
stop-service wuauserv
set-service wuauserv –startup disabled
Untuk memastikan services sudah benar-benar mati, periksa dengan command ini.
get-wmiobject win32_service –filter “name=’wuauserv'”
Jika sudah mati maka StartMode nya adalah Disabled dan State nya Stopped.
Untuk menghidupkan Windows Update service lagi, cukup eksekusi command ini
set-service wuauserv –startup manual
start-service wuauserv

Bonus: Mengembalikan Settings Windows Update Lawas

Tips ini merupakan tambahan dari techten128 melalui kolom komentar. Dengan oprek registry ini kamu bakal bisa mengembalikan settings Windows Update lawas, sehingga bisa mematikan fitur automatic update di Windows 10.
  • Buka Registry Editor dengan Win + R > ketik regedit > Enter
  • Browse ke key HKEY_LOCAL_MACHINE\SOFTWARE\Policies\Microsoft\Windows
  • Di key Windows, klik kanan > New > Key > beri nama WindowsUpdate
  • Di key WindowsUpdate, lakukan lagi klik kanan > New > Key > beri nama AU
  • Klik kanan di key AU yang dibuat tadi, buat DWORD value dengan nama NoAutoUpdate
  • Klik dua kali di key NoAutoUpdate, set menjadi 1. Klik OK.
  • Tutup Registry Editor. Buka Settings > Update & security > Windows Update, klik check for updates agar perubahan registry tadi bisa langsung diterapkan.
Kalo berhasil, nanti seperti gambar ini:
5 Cara Mematikan Automatic Update di Windows 10 Secara Paksa (Demi Menghemat Kuota Internet) — Tips #15

Penting..!

Perlu diingat bahwa Microsoft kini menempatkan Windows 10 sebagai layanan dan bukan software lagi. Artinya Microsoft bakal rutin merilis update dan fitur baru begitu update tersebut tersedia. Untuk menginstall update terbaru, Windows 10 juga bakal memerlukan update-update sebelumnya. Untuk itu jika memang tidak karena terpaksa (kuota yang memang sangat terbatas), maka sebaiknya jangan matikan Automatic Update Windows 10 ini. (Baca juga: 7 Langkah Cerdas Menghemat Kuota Internet di Windows 10 yang WAJIB Kamu Ketahui)
Bantu sebarkan ke teman-teman pengguna Windows 10 lainnya, siapa tahu mereka ingin menghemat kuota juga.

Sumber : http://winpoin.com/5-cara-mematikan-automatic-update-di-windows-10-secara-paksa-demi-menghemat-kuota-internet/

Monday, February 1, 2016

CARA BONGKAR LAPTOP HP PROBOOK 4421s

CARA BONGKAR LAPTOP HP PROBOOK 4420s

Pertama, baut-baut utama pada laptop ini ada di bawah baterai laptopnya, jadi lepas dulu baterainya dan akan terlihat 4 buah baut. Dan bukalah semua bautnya.

Lalu pindah ke bagian depan laptop dan buka penutup speaker seperti pada gambar dengan cara menekan sedikit dan menggesernya ke atas.

Lalu kedua,kita harus membuka keyboard nya dengan cara membuka ke 4 baut yang menempel. (Lihat gambar dibawah)

Setelah itu geser keyboard ke atas untuk membukanya, dan hati-hati karena ada kabel fleksi yang masih menempel pada motherboard. Dan cabutlah kabel itu.


Lalu Ketiga, Kita akan membuka TouchPad nya dengan cara membuka baut-baut yang menempel pada TouchPad. Dan setelah itu kita membukanya dengan cara menekan dan menggeser TouchPad ke kanan


Dan terlihatlah komponen dari laptop ini

Laptop ini menggunakan RAM-DDR3, Berikut cara melepaskan RAM, dengan cara membuka pengait RAM di kedua sisi dan geser ke samping sedikit dan otomatis RAM terlepas sendiri.

Dan untuk melepaskan DVD-ROM dari tempatnya adalah dengan melepas satu baut yang terpasang lalu geser keluar DVD-Rom itu.

Nah di sebelah RAM anda akan melihat penutup yang di dalamnya terdapat CPU,Kipas cooling,dll. Untuk membukanya dengan cara melepaskan baut-baut yang menempel.

Lalu setelah itu buka dan terlihat komponen di dalamnya.

Kamu bisa melepaskan kipas di sini yang bertujuan untuk membersihkan debu yang menempel pada kipas, cara bukanya anda pasti mengerti. Hhe..

Gambar di bawah adalah CPU(CPU nya ada di bawah pelindung logam seperti pada gambar) dan yang warna oranye itu selang untuk membuang panas CPU menuju kipas.
Ini gambar slot PCMCIA

Ini Harddisk jenis eSATA. Berikut cara membuka Harddisk jikalau mau menggantinya dengan harddisk yang kapasitasnya lebih gede, Lepas bautnya dan tarik ke atas Harddisknya.

Sekian saja yang bisa saya jelaskan, maaf bila ada yang kurang dan maaf fotonya kurang bagus.

Note: Saya pun pada saat membongkarnya terjadi kesalahan fatal hanya karena ‘SATU’ baut yang menempel yang saya tidak mengetahuinya. Jadi sebelum kamu mau membongkarnya, saya sarankan untuk mempersiapkan alat-alat yang berguna terlebih dahulu sebelum memulainya.
 
Sumber : http://jibood.blogspot.co.id/2010/12/cara-bongkar-laptop-hp-probook-4420s.html?showComment=1454295719771#c873789568117987280